Salt Dough Ornaments 2026: How To Plus Creative Decorating Tips
Salt dough ornaments have become a go-to holiday project again, and it’s easy to understand why. They're cheap to make, deeply nostalgic and easy enough for beginners, yet still crafty enough for the creatives out there. A recent New York Times feature highlighted how many people are returning to handmade holiday gifts, choosing projects that feel personal and meaningful rather than mass produced. If that sounds like you, salt dough ornaments are just what you need.
You can shape them into anything you like, decorate them in ways that suit your style and create pieces that become part of your family Christmas traditions year after year. Some people make them as Christmas gift ideas, others as keepsakes and many as a way to slow down during a busy season.
Whether you are crafting with kids or making something calming for yourself, this guide will help you create ornaments worth bringing out every December.
Jump to Section
- What Are Salt Dough Ornaments?
- Classic Salt Dough Ornament Recipe
- How to Make No-Bake Salt Dough Ornaments
- Salt Dough Ornament Variations
- Decorating Ideas for Salt Dough Ornaments
- Salt Dough Ornaments for Kids
- Best Salt Dough Ornaments for Adults
- Crafting Tips for Salt Dough Ornaments
What Are Salt Dough Ornaments?
Salt dough ornaments start with pantry staples, but anyone who’s ever made them knows they’re more than a quick Christmas craft. They’ve stayed popular for generations because they’re inexpensive, forgiving and easy to make your own.
Once they dry, you get a sturdy, clay-like surface that's easy to decorate with small personal touches.
Classic Salt Dough Ornament Recipe

Do you put salt dough in the oven? Yes — and it’s one of the easiest ways to get reliable results. This traditional salt dough recipe bakes low and slow, making it simple for beginners and satisfying for more experienced crafters. Kids usually love the mixing and rolling, while adults tend to enjoy shaping and adding the little details that make each piece feel personal.
Here’s what you’ll need:
Equipment
- Large mixing bowl
- Wooden spoon
- Rolling pin
- Cookie cutters (holiday shapes work best)
- Parchment paper or silicone baking mat
- Baking sheet
- Straw or skewer for creating hanging holes
- Twine or ribbon
Ingredients
- 1 cup table salt
- 1 3/4 cups all-purpose flour
- 1 cup warm water
- 1–2 tbsp cinnamon (optional for color and a subtle holiday scent)
Yield: About 24 ornaments
Cook Time: 1.5–2 hours, plus cooling
How to Bake Classic Salt Dough Ornaments

Prepare the Oven: If you’re using the baking method, preheat your oven to 250°F (120°C). The low temperature helps the ornaments dry slowly, which keeps their shape intact and reduces cracking. If you’re looking for the no-bake version, skip ahead.
Mix the Dough: In a large mixing bowl, combine the salt and warm water. Stir until most of the salt dissolves, then gradually add the flour. Mix with a wooden spoon until the dough starts to come together. For a warmer color and subtle holiday scent, you can add 1–2 tablespoons of cinnamon.
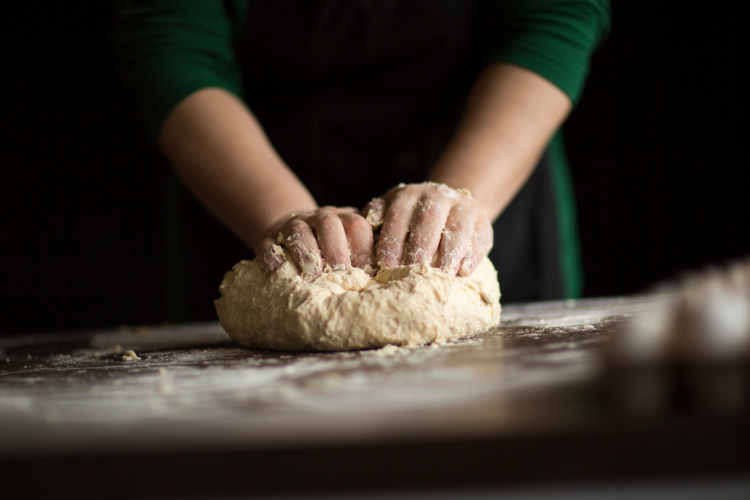
Knead the Dough: When the mixture becomes too thick to stir, turn it onto a lightly floured surface and knead until smooth and pliable. It should feel soft, not sticky. Add a few drops of water if it’s crumbly, or a pinch of flour if it’s tacky.
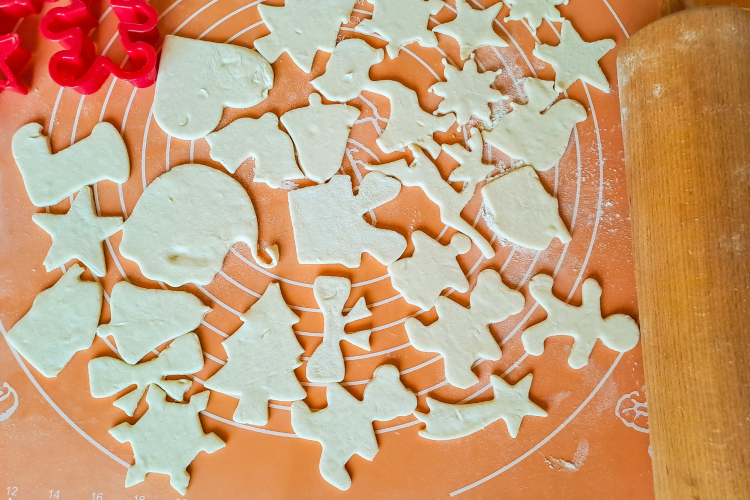
Roll Out the Dough: Divide the dough into smaller pieces and roll each one to about 1/4–1/2 inch thick. A light dusting of flour keeps everything from sticking. Roll gently so the surface stays smooth and free of cracks.
Cut Out Shapes: Use cookie cutters to create your ornament shapes and transfer them to a parchment-lined baking sheet. Add a hanging hole with a straw or skewer. If you want more texture, gently press in pine branches, fabric scraps or even a fingertip pattern before baking.
Bake the Ornaments: Bake for 1.5–2 hours, checking occasionally. The ornaments should feel firm and dry but not overly browned. Larger or thicker pieces, especially handprints, may need a little more time. Let them cool completely right on the baking sheet.
Add the Finishing Touches: Once cooled, thread twine, ribbon or leftover gift string through each hole. Hang your ornaments on the tree, tie them onto gifts or display them anywhere you want a bit of homemade holiday charm.
How to Make No-Bake Salt Dough Ornaments
So, is it better to bake or air-dry salt dough? It really depends on your timeline and your crafting style. If you’re not in a rush or prefer to skip the oven altogether, no-bake ornaments are a lovely alternative. They dry naturally over a few days and are especially handy when you're crafting with young children or keeping the kitchen cool. The process is simple, calm and great for anyone who enjoys letting a project unfold slowly.
For the no-bake salt dough ornaments version, you'll need:
Equipment
- Mixing bowl
- Rolling pin
- Cookie cutters
- Straw or skewer for making hanging holes
- Parchment paper
- Cookie sheet
Ingredients
- 2 cups all-purpose flour
- 1 cup table salt
- 1 cup warm water
Yield: About 24 ornaments
Step-by-Step Instructions for Making No-Bake Salt Dough Ornaments
Mix the Dough: In a large mixing bowl, combine the flour and salt. Slowly pour in the warm water, stirring as you go until the mixture comes together. Adjust as needed — a sprinkle of flour if it’s sticky, or a tiny splash of water if it feels too dry.
Knead the Dough: Turn the dough onto a floured surface and knead until it’s smooth and clay-like. It should feel firm enough to hold its shape but soft enough to roll out easily. This step helps the ornaments dry evenly and resist cracking.
Roll Out and Cut Shapes: Roll the dough to about 1/4 inch thick. Use cookie cutters to create your shapes, then transfer them to a parchment-lined cookie sheet. Make a hanging hole with a straw or skewer. If you want extra texture, gently press in stamps, pine needles or anything with an interesting pattern before drying.
Drying Time: Place the ornaments somewhere warm and out of the way to air-dry for 3–4 days. Flip them occasionally so they dry evenly on both sides. They’re ready for decorating once they feel completely firm and dry to the touch.
Salt Dough Ornament Variations

Once you’ve got the base salt dough recipe, you can personalize it in all sorts of small ways. A few simple additions can shift the texture, color or even the scent, depending on the look you’re going for.
1. Cinnamon dough: Stir a few tablespoons of cinnamon into the mix for a warm brown shade and a scent that feels very festive.
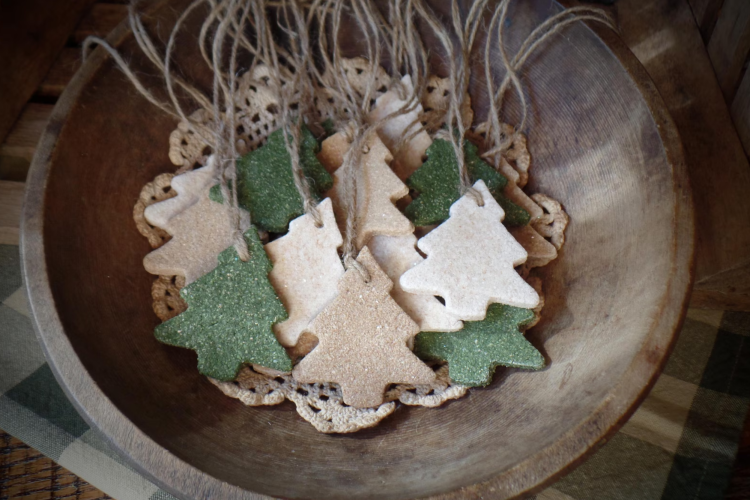
2. Colored dough: Add food coloring to the water before combining everything. Pastels, deep reds, icy blues — anything works.
3. Glitter dough: Work fine glitter into the dough for a soft shimmer that catches the lights on your tree.
4. Botanical dough: Press dried herbs or tiny leaves into the surface to give your ornaments a natural, textured finish.
5. Smooth white dough: Use fine salt and knead a bit longer to create a smooth, almost porcelain-like surface.
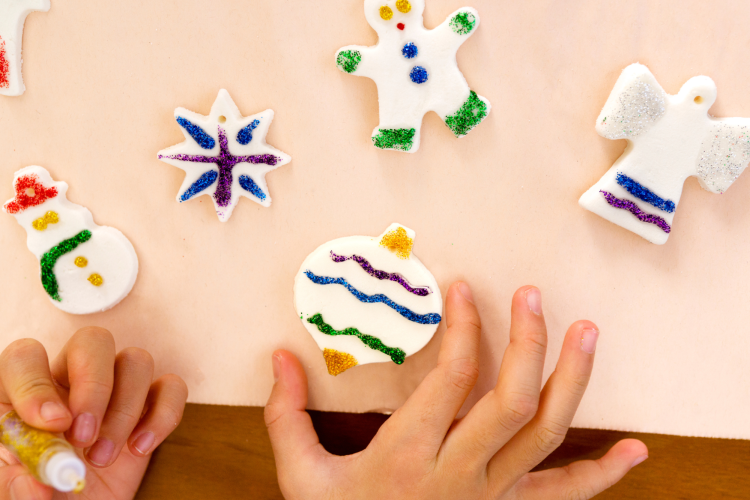
Decorating Ideas for Salt Dough Ornaments
Once your DIY Christmas decorations are dry, it’s time to unleash your creativity. Salt dough ornaments can be painted, stamped or embellished with various craft supplies.
6. Add color: Try bold holiday colors if you want the shapes to pop, or switch to metallics when you're aiming for something a little more grown-up — gold, copper and deep silver look especially good on the natural dough. Pastels also work surprisingly well if your holiday palette leans softer.
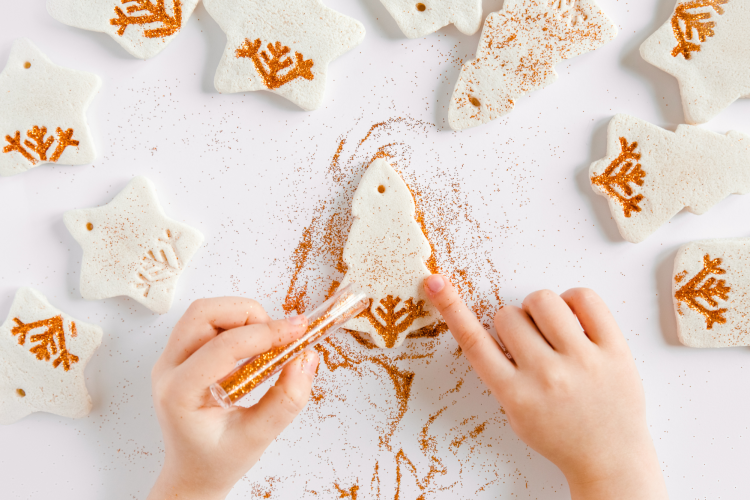
7. Add sparkle: Glitter can be as subtle or sparkly as you like. A thin coat of Mod Podge with a light sprinkle creates a frosted effect, while a full glitter dip turns the ornament into a little disco of its own.
8. Add detail: Fine-tipped paint markers are great for adding small details or messages without fussing over tiny brushes. Gold and silver markers read especially well once they’re sealed. You can also use stamps to press patterns onto the surface for a clean, repeatable design.
9. Tiny extras: A small bow, a tied ribbon or a pressed sprig of greenery can make even a simple shape feel thoughtful and finished.
10. Protect your designs: Seal your ornaments with a clear, non-toxic varnish once they’re decorated. It protects the colors, keeps glitter in place and helps them last long enough to become part of the family holiday box.
Salt Dough Ornaments for Kids
These kid-friendly ideas are easy to shape, easy to decorate and always end up a little sweeter than you expect.
11. Family Handprint Keepsakes
Roll out the dough and press in a tiny hand (or a not-so-tiny one). Cut around the shape and let it dry into a keepsake that hits you right in the feelings. A lot of families make one every year, and it’s wild how much those little hands change from December to December.
12. Mini Snowflakes
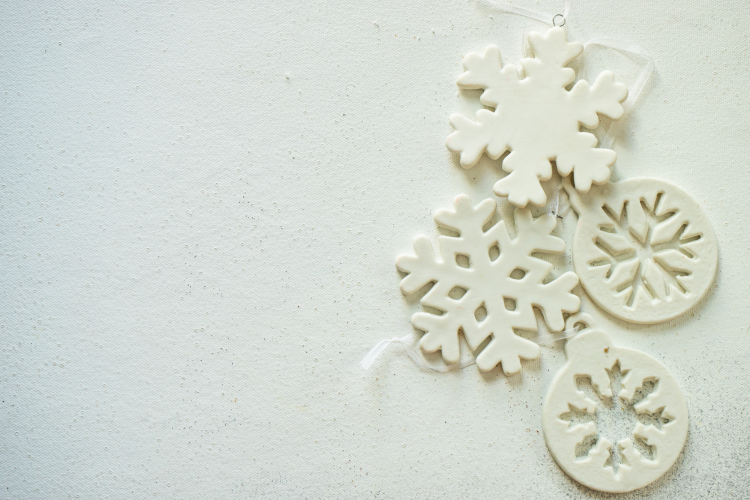
Snowflake cutters make this one a breeze. Go with a few different styles to achieve varied snowflakes that all look a little bit different. Once they’re dry, a quick coat of white or silver paint and a dusting of glitter turns them into something that looks way fancier than the effort it took.
Best Salt Dough Ornaments for Adults

Older kids and adults can take salt dough in a more detailed direction. Once the shapes are cut, the dough becomes a blank canvas for imprinting, stamping or adding little textures that feel personal. These DIY Christmas ornaments also make thoughtful gifts for crafters — especially the ones that celebrate family memories or small moments.
13. Nature-Inspired Imprints
Collect leaves, pine needles or small flowers and press them into the dough before cutting out shapes. The textures bake right in, giving you salt dough ornaments that feel earthy and handmade without much effort.
14. Personalized Name Tags
Roll the dough out, cut simple rectangles and write names with a toothpick or skewer. They double as gift tags or place cards for holiday dinners.
15. Animal Paw Print Keepsakes
If you have a pet, gently press a paw into the dough to create a sweet little keepsake. It’s quick and sentimental and is a great gift idea for parents of fur babies. Gifts for cat lovers or dog lovers, done.
Crafting Tips for Salt Dough Ornaments

These Christmas art projects are simple to make when you follow directions and these helpful tips.
16. Storing Leftover Dough: Wrap any leftover dough in plastic wrap and store it in an airtight container in the refrigerator for up to a week.
17. Avoid Overbaking: Baking at too high a temperature can lead to cracking, so stick to low heat and allow ample time for drying.
18. Use Non-Toxic Paints: If children are involved, ensure that all paints and sealants are non-toxic and safe for little hands.
19. Pet Safety Alert: Keep salt dough ornaments out of reach from pets, as the high salt content can be harmful if ingested.
The Christmas season is full of opportunities for fun ideas and exciting crafts. From Christmas lunch ideas to clever craft ideas, there’s plenty of room for creativity and joy. Whether you’re crafting with kids, creating gifts for friends or simply looking for a quiet project that feels grounding, these ideas for salt dough ornaments will help you shape decorations worth keeping.
For even more fun Christmas decorating ideas, check out other experiences happening on Classpop!