The Ultimate Guide to Perfecting the Pinch Pot
When it comes to hand building pottery, the pinch pot is a classic for a reason. Not only is it one of the best projects for introducing beginners to working with clay, but it’s also one of the most versatile objects for building larger and more complicated pieces of handmade pottery.
Is this your first time working with clay? Whether it is your first time or your hundredth, our guide will give you all the best techniques and tricks for perfecting the pinch pot! We’ll break it down step-by-step and even include ideas for adding more advanced designs.
As you build your beautiful pottery creations, you might even find yourself feeling more relaxed. According to researchers at Michigan State University, engaging in art therapy can result in a whole host of mental health benefits, including a reduction in stress and anxiety in people of all ages. Let's get started!
Jump to Section
How to Make a Clay Pinch Pot
Getting Started
If you’re just starting out with pinch pottery, a great way to learn the basic techniques of this art form is by attending fun pottery classes near you, especially if you don’t have the time or patience to teach yourself.
Experienced artists will guide you through the process of crafting handmade pottery pieces, including how to make the classic pinch pot. These fun and engaging classes take all the stress out of learning and also make for a great activity with friends and family.
For those of you local to the Bay Area, we suggest checking out these top-rated pottery classes in San Francisco and pottery classes in San Diego. East Coasters can explore pottery classes in Boston and other artsy areas.
No matter where you are, though, you can always experience the fun and excitement of exploring pottery making classes near you!

Prepare to Work With Clay
Before you start the clay pot making process, you’ll want to make sure your hands are prepared for the task. Mainly, this means ensuring that your fingernails aren’t too long — long nails can actually cut into the clay and get in the way.
Additionally, you don’t want to be handling the clay with super warm or hot hands because this will actually dry out the clay and lead to cracking.
An easy way to avoid this problem is to run your hands under cold water before handling the clay, repeating as necessary throughout the process.
Luckily, the more you practice this technique, the faster you will become, so you should have to rinse your hands less frequently.
Gather Materials
To get started with your pinch pot project, you’ll want to gather your materials. Most importantly, you’ll need to select your type of clay.
Grogged clay is one of the best options for first-timers as it’s a little bit stronger and will therefore hold its shape without cracking. You can also create a mixture of half-grogged clay and half-smooth clay (just make sure they both fire to the same temperature so you don’t run into any issues during the drying process).
As you get more and more used to handling and pinching the clay, you’ll be able to advance to using smoother and finer clay for your future clay pinch pots.
Really all you need to make a basic pinch pot is your hands and clay, but you may find it useful to have a few other tools nearby to help with smoothing out and detailing.
While you can invest in pottery tools, common household items like credit cards or dish scrapers, wooden popsicle sticks, forks and spoons will work too.
The Pinch Pot Process
Shaping the Body
Once you’re ready to start working with the clay, you’ll want to start by forming the clay into a ball, keeping the edges as smooth as possible.
Then, press your thumb into the center of the ball, a little over halfway down to the bottom, stopping when you start to feel a bit of pressure in the palm of your other hand.
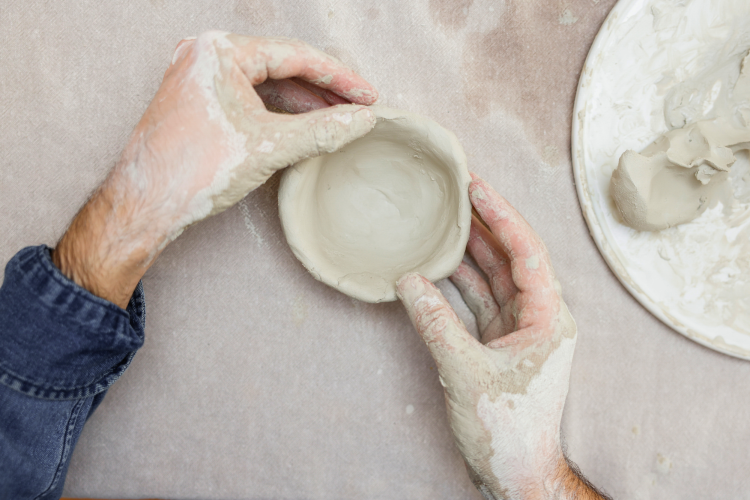
From there, start using your crooked thumb and fingers to gently pinch out the shape, starting from the bottom of the ball and moving upwards. You’ll want to keep your fingers straight while you pinch, so you don’t just pinch with the fingertips. This will help ensure you are actually pinching the whole ball of clay and not just one small area.
As you pinch, continue to rotate the clay ball to hollow out the shape, keeping the walls even in thickness. Eventually, you’ll want to reposition your hands, placing the fingers inside the ball and thumb on the outside so you can thin out the walls and build height.
As the clay ball begins to open up, you can relax your fingers a bit and start curving them to help form the shape. Continue following this process until you’ve achieved the desired shape for the body of your pot. In general, you want the thickness to be about that of your pinky finger.
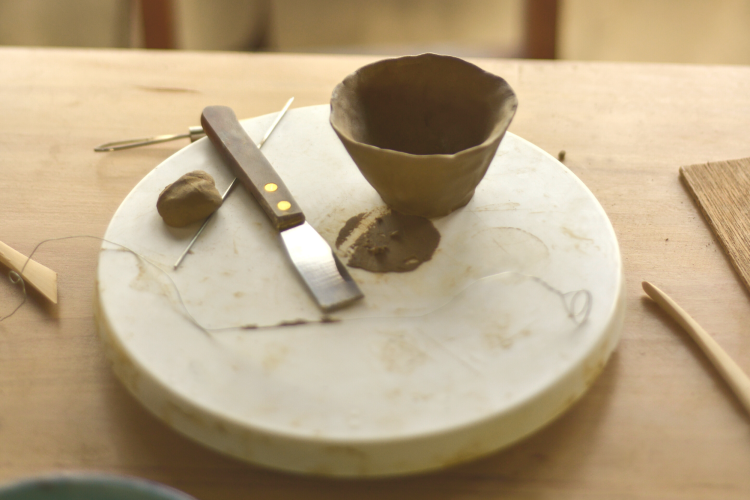
After shaping, you may also want to press down on the bottom of the pot to make sure it sits flat and smooth the inner surface to remove lumps — this is where tools like a small scraper might come in handy.

Refine the Rim
When you’ve finished shaping the body of the pot, you can start to refine the rim, which is usually the most noticeable part of the pot.
One way to level out the rim is to flip your pot upside down and gently drop it onto a flat surface. You can also use a scraper or curved spoon to smooth out the outer edges of the pot, as well as along the rim.
At this point, you’ll have successfully crafted a basic clay pinch pot. From here, you can either let your pot air dry (usually 2-3 days) before firing and/or painting, or you can continue by adding some more intricate pinch pot designs and detail work, such as a foot ring or coiled rim.
Pinch Pot Techniques
Coiling
One of the easiest ways to add a bit of texture to your pot is to add coils. It’s essentially the same process as rolling a clay worm or snake before.
Once you’ve rolled out the clay into a sausage-like shape, you can press the coil onto the rim, or maybe use it to form a handle for your pot. Of course, you can add smaller clay parts of any shape you wish.
Just form your desired shape and then connect it to the pot, using a little bit of water and scoring the clay (making small little notches along the two edges that will be joined together) if needed.

Foot Ring
To add a foot ring to your pot, first roll a coil of clay (using the technique above) to an appropriate thickness for supporting your pot, then coil it into a circle, making sure the ends overlap.
Then, cut through both ends on a diagonal and seal up the ring by scoring and slipping the edges together. Once you’ve smoothed over your ring, you can move on to attaching it to your pot. You may need to use a wooden spatula or paddle to flatten the base of the bowl.
To add the foot ring, begin by marking the position of the ring on the bottom of your pot. Then, score and slip along both the bottom of the pot (where you just marked) and the ring and fuse them together with a bit of water.
Lastly, smooth out any bumps or rough patches.
Pinch Pot Ideas
Project Ideas
The pinch pot method can be used to create more than just basic pots! You can create your own handcrafted coffee mug by forming a taller pinch pot and adding a handle.
Some other great pinch pot project ideas include soup bowls, small vanity trays and circular soap dishes. Not only will these projects help you perfect your pinch pottery skills in a fun and exciting way, but you’ll also wind up with beautiful pieces of handmade pottery to decorate your home or gift to friends!

Design Ideas
After you’ve crafted your piece, you can start getting creative by adding extra details and unique pinch pot designs on the clay’s surface. One way to do this is to create impressions in the clay, such as by using a bottle cap to imprint small circles on the walls or edges.
Another idea for adding some extra detailing is to carve out lines, dots and grooves. This can be done with clay sculpting tools, but also with toothpicks, craft sticks, spoons and other household items.
Once the clay is dry, you can also experiment with different paint designs, or even glue on buttons and other decorative objects.
When it comes to pottery for beginners, learning how to make a pinch pot is a perfect first step. No matter what your artistic ability or skill level is, if you follow the simple steps and process outlined above, you’ll be making and perfecting the pot in no time at all.
The most important part is to have fun and let making a useful and fun pottery project melt away some of your stress! Follow these American Potters on Instagram for more inspiration.
For even more creative ideas and inspiration, check out other experiences happening on Classpop!