DIY Floating Shelves Done Right: 2026 Design Ideas & Build Basics
DIY floating shelves are a clever way to add visual appeal and update a room without weighing it down. They add storage where you need it, but they don’t dominate the space the way cabinets or chunky shelving units can. And if done right, they feel like part of the wall rather than something bolted onto it.
That’s the beauty of their design, really. According to ArchDaily, shelving works best when it blends into the architecture around it instead of overpowering the room. Floating shelves do exactly that, adding interest without adding visual mass.
Pre-made shelving units don’t always live up to that promise. Building your own gives you the chance to slow down and think about what actually works for your space, how the wall is built and how the shelves will be used day to day. The difference shows in the final result, which is exactly what the rest of this guide is here to help you get right.
Jump to Section
- What Are DIY Floating Shelves?
- How Floating Shelves Work (Brackets vs Hidden Support)
- DIY Floating Shelf Ideas by Room
- Easy DIY Floating Shelves for Beginners
- How to Build DIY Floating Shelves at Home
- Common Floating Shelf Mistakes to Avoid
- DIY Floating Shelves FAQs
What Are DIY Floating Shelves?

DIY floating shelves are wall-mounted shelves that use concealed hardware, like hidden brackets or rods, so the support stays out of sight. The result is a shelf that appears to float against the wall rather than sit on visible supports.
That subtle difference is what makes floating shelves work so well in modern DIY home décor. Without brackets breaking up the lines, they have an uncluttered look with clean lines and a minimalist aesthetic. DIY floating shelves also make smart use of vertical space, which matters most in smaller rooms where bulky storage can quickly make things feel crowded.
How Floating Shelves Work (Brackets vs Hidden Support)

Before you start thinking about where you’ll hang your shelves and what you’ll put on them, it’s important to understand how they work. (We’ll get into the nitty-gritty details later; this is just a basic overview.) Most DIY floating shelves rely on one of two support methods: metal brackets or a hidden cleat system. Both are designed to disappear once the shelf is installed, but they behave a little differently in practice.
Both methods share many similarities, but floating shelf brackets are the more straightforward option. If you use brackets, you’ll simply drill holes in the shelf, screw metal brackets into the wall, and the shelf slides over them so the hardware stays out of sight. Since the shelf is hollow, you can’t see the brackets (however, beginners may find it easier to set the shelf on top instead).
The key is anchoring the brackets into studs so the weight of the shelf and anything placed on it is properly supported. When installed correctly, bracket-based shelves look clean and feel solid without adding visual bulk.
With a cleat system, instead of relying on metal hardware, you first fix a wooden cleat to the wall and the shelf fits tightly over it, locking the two pieces together. Cleats are the better choice for deeper shelves or heavier loads like books because the weight is spread more evenly along the wall. The downside of this setup is the complexity. Cleat systems require more precise measuring and construction, since both the wall support and the shelf itself have to be built to fit.
From a design perspective, both methods aim for the same result: structure without visual interruption. Both systems integrate into the wall, maintaining visual lightness. Whether you choose brackets or a cleat, the goal is the same — support that does its job quietly, so the shelf looks intentional rather than engineered.
DIY Floating Shelf Ideas by Room
DIY floating shelves work best when they’re planned around how a room is actually used. In some spaces, they act as a focal point. In others, they quietly solve a storage problem without adding visual weight. Looking at them room by room makes it easier to decide where they’ll have the most impact.
DIY Floating Shelves Next to the Fireplace

Fireplace décor is so much more than just the mantel. By integrating DIY floating shelves next to the fireplace, you can add symmetry and clean lines to your living room, as well as some extra storage or additional display areas. Built-in styles feel especially cohesive, but even a simple stacked layout with books and plants can soften the space without competing with the fireplace itself.
What matters most here is placement. Shelves should sit far enough from direct heat to avoid warping or drying out the wood, and finishes should be chosen with warmth in mind.
Likewise, what you place on your shelves needs to hold up to the heat. Candles are a natural fit visually, but they work best when spaced out and treated as accents rather than clusters. If you want to lean into the handmade look, candle making classes in Atlanta, the Bay Area and Boston are an easy way to create pieces that feel personal and intentional on your DIY floating shelves.
Living Room Floating Shelves

Beyond fireplace ideas, DIY floating shelves can help define your living room décor ideas without closing it in. Ideally, they should be at eye level for easy viewing; you can place them above furniture, such as the sofa, the TV or a desk, or in empty wall spaces as a focal point.
Use the shelves to showcase your style — for example, they provide an excellent opportunity to display DIY fall décor. You can also frame windows or doors with DIY floating shelves.
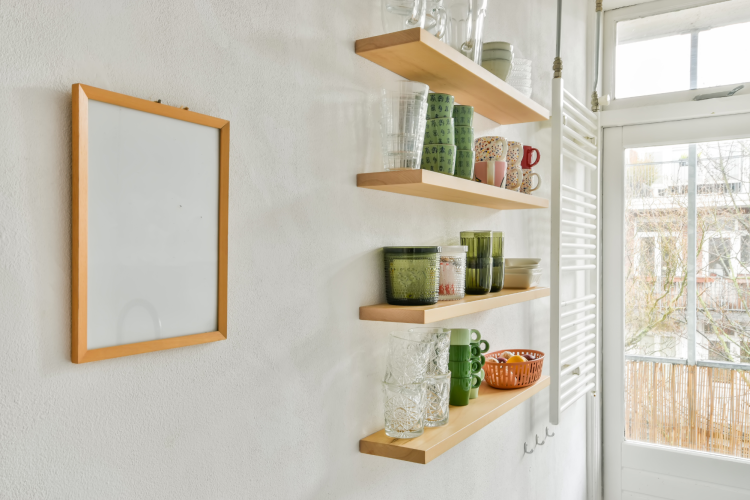
Kitchen Floating Shelves

In the kitchen, DIY floating shelves balance form and function more directly. They work especially well when cabinet space is limited or when you want to break up a wall of closed storage. Everyday items like dishes, glassware and pantry staples are easy to reach and can double as visual elements when arranged thoughtfully.
Clear containers keep things looking organized, while plants or artwork prevent the shelves from feeling purely utilitarian. Placement above counters, near a window or even in an unused corner can open up the room and make the kitchen feel less boxed in, as long as shelves aren’t overloaded or pushed too close to cooking surfaces.
Bedroom or Hallway Shelves

Bookshelves can be expensive and difficult to put together. DIY floating shelves, on the other hand, serve the same purpose while being much simpler to build and install.
In narrower spaces like hallways, floating shelves provide storage without cutting into floor area, which helps keep traffic paths clear. Books, decor and personal items all work here, especially when shelves are kept shallow and evenly spaced.
In bedrooms, they’re useful for displaying personal items without overwhelming the space, particularly when paired with lighter finishes that blend into the wall.
Easy DIY Floating Shelves for Beginners

If you’re a home improvement beginner, you need easy DIY floating shelves that are simple to build and install, look nice and are sturdy enough to hold any items you want to display. In this case, DIY floating shelves with brackets are the best choice. This effectively eliminates a step since you won’t need to build a cleat to support the shelves.
Instead, the brackets are anchored directly into wall studs and the shelf slides into place, keeping the hardware out of sight. Fewer steps mean fewer chances for things to go sideways, which makes this approach ideal if you’re tackling floating shelves for the first time.
Materials can be simplified too. You can buy pre-cut DIY floating wood to avoid measuring and cutting altogether. Just ensure it’s real wood, as synthetic types don’t hold up nearly as well.
Another option is to purchase a DIY floating shelf kit. This is an excellent compromise if you want the sense of accomplishment that comes from building something without having to search for all the materials yourself. They give you the satisfaction of building something yourself while ensuring the pieces fit together properly, which helps avoid alignment issues once the shelves are on the wall.
The biggest advantage at this stage is pace. Taking the time to measure carefully, locate studs and install everything level makes a noticeable difference in the final result. Floating shelves tend to highlight small mistakes, so moving slowly is less about perfection and more about ending up with shelves that feel intentional and secure.
If you’ve been bitten by the DIY bug after building your floating shelves, keep the obsession going with pottery classes in Austin, Chicago or Los Angeles. They offer another way to create pieces that feel personal and work well styled on DIY floating shelves once they’re finished.
How to Build DIY Floating Shelves at Home
Building DIY floating shelves is less about advanced carpentry and more about planning the support system before anything goes on the wall. Once you understand how the shelf will be held in place, the rest of the process becomes much more straightforward.
Start With the Right Materials

Most DIY floating shelves use the same core materials, with a few differences depending on the support method you choose.
Wood
-
Plywood or solid wood boards for the shelf surface
-
2x4 boards only if you’re building a cleat system
-
Floating shelf brackets if you’re using a bracket-based install, sized to match shelf depth
Tools
-
Stud finder
-
Drill and saw
-
Measuring tape and level
-
Wood screws and wood glue
-
Spade bit sized to fit bracket rods
Finishing supplies
-
Sandpaper
-
Wood conditioner
-
Paint or stain
-
Protective topcoat
Pre-cut wood or a DIY floating shelves kit can simplify this stage and reduce measuring errors, especially if this is your first time working with shelves.
Decide How the Shelves Will Be Supported
Before cutting anything, decide which support method makes the most sense for your space.
-
Bracket-based shelves are the simplest and most forgiving. They work well for shallow to medium-depth shelves and are ideal for first-time installs.
-
Cleat systems offer the most strength and are better suited for deeper shelves or heavier items like books.
-
Adhesive installs are decorative only and should be reserved for lightweight items on smooth walls.
Once that decision is made, installation follows a clear sequence.
Installing DIY Floating Shelves With Brackets
This is the most common approach and the easiest place to start.

Step 1: Cut the Plywood
First, you’ll need to cut the wood for your DIY floating shelves. From sheets of plywood, cut pieces that match your desired dimensions. Or, as we've mentioned, use pre-cut boards or a kit to save time.
Step 2: Locate Studs
The next step in building DIY floating shelves at home is locating wall studs with a stud finder. This is a crucial step because brackets rely on stud anchoring for load capacity, not drywall alone.
Once you’ve located the studs, mark their centers with a pencil, and use a level and painter’s tape to visualize where the brackets will go.
Step 3: Position Brackets and Drill Holes
One by one, position the brackets over the studs — using a level to make sure they’re straight — and drill pilot holes.
Step 4: Secure Brackets

Now, it’s time to install the brackets for your DIY floating shelves. Start by inserting wall plugs into the holes you just drilled (if needed for drywall), then screw the brackets into at least two studs for maximum stability.
Step 5: Prepare the Shelf
Next, hold the shelf up to the wall and mark the bracket positions on the back side of the wood. Drill holes into the shelf that are roughly six inches deep and slightly larger than the bracket rods.
Step 6: Mount the Shelf and Add Finishing Touches
Finally, slide the shelf onto the bracket rods, then step back and admire your handiwork. Perform any finishing touches, such as sanding, conditioning, painting or applying a protective coating to the wood, here. Now, it’s time for the fun part: deciding what to put on your DIY floating shelves.
Installing DIY Floating Shelves Without Brackets (Cleat Method)

If you don’t want to use brackets for your DIY floating shelves, you’ll need to create a hidden support system with cleats or adhesive. The cleat method offers the most support, so it’s the best option if you plan to display heavy objects, like books, on your DIY floating shelves.
Step 1: Build the Shelf Box
Construct a hollow wooden box that’s thick enough to house the cleat. Unlike DIY floating shelves with brackets, these shelves need to be thicker to accommodate the cleats.
Step 2: Create the Cleats
Cut two matching wood strips and bevel one edge of each at a 45-degree angle so they lock together. The interlocked pieces will support the shelf — one is placed on the wall, while the other goes directly on the shelf.
Step 3: Locate Studs
Use a stud finder to locate wall studs, then mark them. With the sloped edge facing the wall, hold up the wall cleat where you want the shelf to go. Using a level for alignment, mark holes for screws in the center of the studs.
Step 4: Mount Wall Cleat
Drill pilot holes into the wall cleat, then screw it into the wall, ensuring the angled side faces up and outward.
Step 5: Attach Shelf Cleat
Next, glue the other cleat to the back of the shelf, with the sloped edge facing down and inward so it interlocks with the wall cleat.
Step 6: Install and Secure the Shelf
Finally, it’s time to mount your DIY floating shelves. Slide the shelf onto the wall cleat so that it connects with the shelf cleat. For added security, insert a small screw through the bottom of the shelf into the cleat. Perform any final touches, outlined above in the instructions for DIY floating shelves with hidden brackets, for a clean, seamless finish.
Using Adhesive (When It Makes Sense)

The third option is using adhesive strips or construction adhesive. It's the simplest way to learn how to install DIY floating shelves without brackets, but it also provides the least support. You should only go this route if your walls are smooth and you don’t plan on displaying any heavy items on your shelves.
Step 1: Build Your Shelves
Follow the steps outlined above for building your DIY floating shelves, or buy pre-cut wood or a kit.
Step 2: Clean Surfaces
Wipe down the wall and shelves with rubbing alcohol to remove dust and oils.
Step 3: Apply Adhesive
Either place adhesive strips, such as Command, or apply caulk to the backs of the shelves.
Step 4: Press and Hold
Press the shelf firmly against the wall for at least 30 seconds to reinforce the adhesive, then wait at least an hour (but ideally several days) before loading. Secure the shelves to the wall with painter’s tape while the adhesive dries/cures.
Common Floating Shelf Mistakes to Avoid
1. Overloading

It’s easy to ignore weight limits for DIY floating shelves, especially if you’re trying to maximize storage. But this can prove detrimental to your walls, items and the DIY floating shelves themselves, as overloading can cause the shelves to sag or pull away from the wall.
Take care not to exceed the suggested weight limit for the DIY floating shelves or hardware to prevent damage to your property and belongings. Remember, floating shelf brackets are the sturdiest option, so don’t use adhesive or dowel rods if you need heavy-duty DIY floating shelves.
2. Inadequate Support
Stability is key for DIY floating shelves. Drywall alone isn’t enough to secure them, so be sure to locate the studs in your wall before installing the shelves. Mount the brackets (if using) in the center of the studs, then set the shelf on top.
3. Choosing the Wrong Materials
Wooden DIY floating shelves are the way to go for durability. While synthetic materials are often lightweight and have a smooth finish, they tend to sag under heavy loads compared to solid wood.
Similarly, choosing the right brackets or other hardware for the total weight of the items you plan to hang on the DIY shelves is crucial.
4. Incorrect Measurements
You may think you can estimate the distance between DIY floating shelves, but being even a few centimeters off can result in uneven shelves that throw off the aesthetic. Use a measuring tape and a level for guaranteed accuracy.
DIY Floating Shelves FAQs
Is It Cheaper to Build Your Own Floating Shelves?

It can be cheaper to build DIY floating shelves if you already have materials, including plywood, hardware and tools, at home. Otherwise, it’s often more affordable to buy premade shelves. That said, DIY floating shelves offer the freedom of customization, so DIY is the better option if that is important to you.
How to Build a Floating Shelf at Home?
DIY floating shelves are great entry-level projects for beginners because they require few materials and little skill. All you need to do is prepare your shelf by drilling holes in the back of a piece of plywood, locating studs in the wall, positioning brackets using a level and securing the brackets to the studs. Then, you can mount your DIY floating shelves and display all of your prized possessions.
What Are the Common Mistakes with Floating Shelves?
The most common mistakes when installing DIY floating shelves include ignoring weight limits, not locating studs before mounting, choosing incorrect materials and uneven spacing due to imprecise measurements.
Now that you know how to build DIY floating shelves, you’re ready to give any room in your house a significant upgrade. DIY floating shelves are stylish, space-saving and easy to install, making them ideal for those seeking a simple home project with a big payoff.
For even more fun DIY home decor ideas, check out other experiences happening on Classpop!